Top 7 Acrylic Nail Designs
Do your bare short nails look dull and boring to you
Published : 08 Aug 2017, 18:47

I bet you’d like the option to grow out your nails so that you can get all those cute nail arts. It’s completely understandable. Whenever you see women having healthy, gorgeous nails and their nail arts, you sometimes wish you could get it done too. You can!
Acrylic nails are especially for people who feel like their nails never grow. Since acrylic nails are a combination of liquid monomer and powder polymer when applied to your nails and exposed to the air, they form a hard layer, so you’re guaranteed to have cute and strong nails. Using acrylics opens a door for experimenting with all kinds of manicures.
Top 7 Cute Acrylic Nail Designs That You Must Try!
We’ve just made your life just that much easier by compiling a list of the best acrylic nail art. Let’s begin without further ado!
1. Summer Acrylic Nails with Beachy Waves
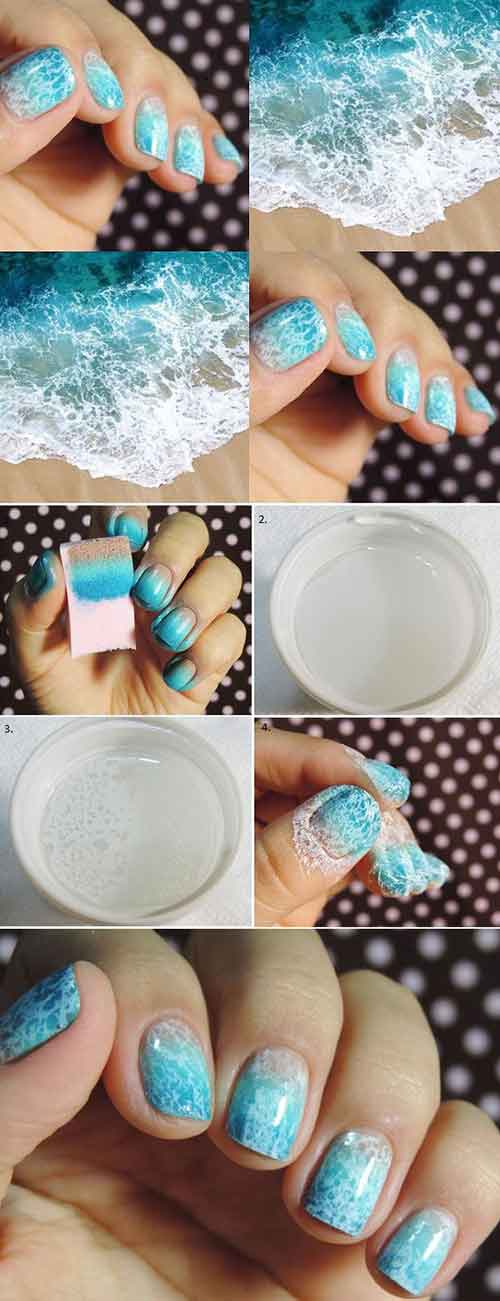
Seeing this nail art makes me want to pack my bags as soon as possible and fly off to a remote island somewhere. It’s so serene to look at! Blue is supposed to be a calming color. So when colors like white, light brown and blue are combined to create this beautiful beachy nail art in this way, it brings peace and relaxation.
What You Will Need
- Sea blue nail polish
- Light blue nail polish
- Light brown nail polish
- White nail polish
- Top coat
- Bowl of water
- Nail polish remover in a spray bottle
How To Apply?
1.On a sponge, apply the sea blue, light blue and light brown shades.
2.Dab it onto your nail, the brown near your cuticle. This will give you an ombre effect
3.Now, in the bowl of water, add a drop or two of white polish.
4.Spray some nail polish remover in the bowl to break up the nail polish slightly.
5.Dip your nails one by one in water.
6.You will achieve the desired look.
7.Clean up the sides of your nails with some nail polish remover.
8.Finally, add a top coat, and you’re all done!
2. Mandala Inspired Nail Art
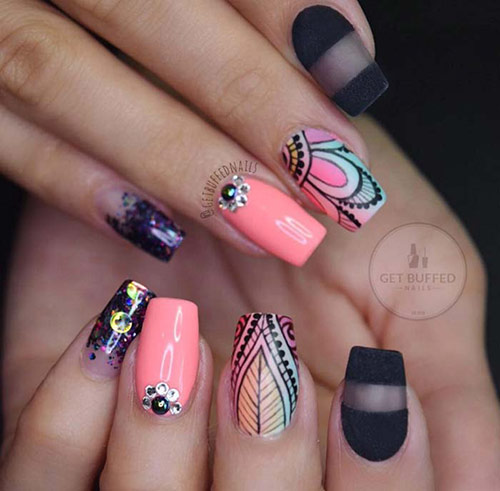
A fun and colorful nail art manicure which is ideal for festivals! This is definitely something that you would see at Coachella. Add on some super cute boho rings, and you’re ready to fit right in at the ever-popular music festival.
What You Will Need
- Salmon nail polish
- Pastel yellow nail polish
- Pastel blue nail polish
- Pastel pink polish
- Pastel purple polish
- Fine brush
- Gray matte polish
- Black matte polish
- Rainbow glitter polish
- Nail jewels
- Makeup sponge
How To Apply?
1.Paint the ring fingernails with the salmon nail polish.
2.On a makeup sponge, add a drop of the pastel colors and dab it onto the middle fingernails.
3.Using a fine brush dipped in matte black polish, create the design as shown in the image. You can add color details afterwards if you wish.
4.Paint the index fingernails with the matte gray. Then, use the black polish to create the block stripes as shown.
5.Use the rainbow glitter polish to create an ombre effect from the top to the bottom on the pinky and thumb fingernails.
6.Add the jewels onto the ring fingernails.
3. Goth and Glitter Nail Art

It’s only right that this one is last, because as you can see, there’s a lot going on. Who knew glitter and goth themes went together? Well, this manicure certainly proves that they go, not just good, but great together.
What You Will Need
- Black nail polish
- Silver glitter nail polish
- Gray matte polish
- Black matte polish
- Black acrylic bow
How To Apply?
1.Let’s take this one nail at a time. The pinky nail is pretty simple. All you have to do is create an ombre effect with the silver glitter at the tip of the nail on one pinky. On the other one, all you need to do is apply the tips with black while making it a slight ‘v’ shape as shown.
2.The ring fingernails would probably have to be the most difficult ones. Once on the nail, paint the entire nail gray and then using a fine brush, create intricate lace patterns. On the other nail, leave the first one fourth of the nail near the cuticle and paint the rest of it with the gray polish. Do the same and create the lace pattern on this nail as well. Add the black acrylic bow to this nail.
3.Create a semi circle near the cuticle on of the nails. Create a broader outline around the semi-circle as seen on the left middle fingernail. Apply a thin stripe at the tip. Follow a similar pattern on the right fingernail, but this time use an inverted ‘v’ shape.
4.Create a French manicure with silver glitter outlined with black. Place another acrylic bow here. On the other nail, create an ombre effect near the tip.
5.Paint both the thumb fingernails black. Create a ‘V’ starting from the cuticle, going up.
4. Red White and Blue Glitter
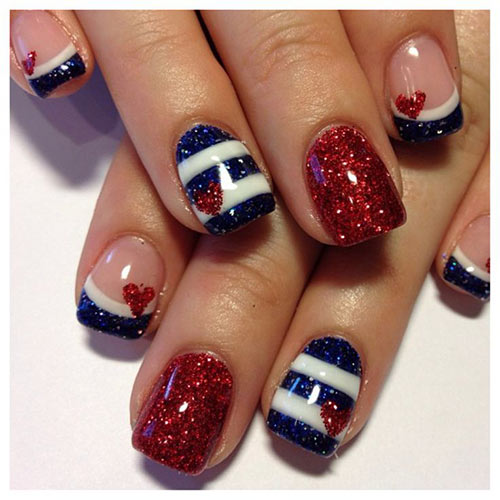
Fan of the sparkles and glitter? You’d love this one then. Red white and blue is a classic color combination. It could be patriotic if you want, or just a simple color combination. Either way, this is a super cute and easy nail art to achieve.
What You Will Need
- Red glitter nail polish
- Blue glitter nail polish
- White nail polish
- Fine brush
- Top coat
How To Apply?
1.Paint the middle and thumb fingernails with the red glitter nail polish.
2.Paint the ring fingernails with the blue glitter polish. Add two stripes and a heart as shown.
3.Apply the blue glitter as a French manicure for the index and pinky fingernails. Add a 4.stripe under the tip and a heart.
5.Finish off with a top coat.
5. Blue Acrylic Nails with Flowers
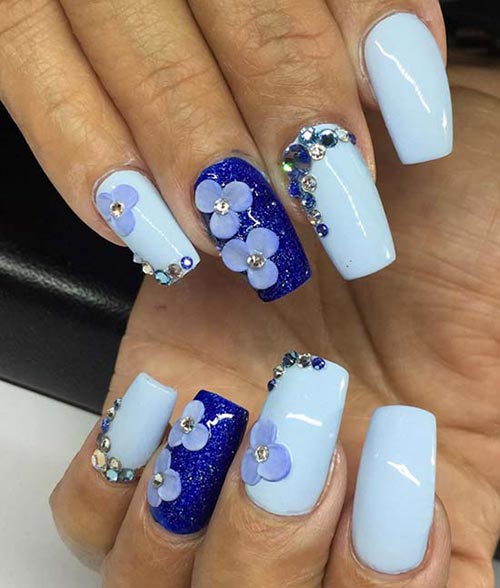
Another amazing nail art involving acrylic flowers. It’s a cute and fun look for the spring and summer when the flowers are full in bloom! It may look complicated, but that’s the best part! It’s so easy to achieve this look! Let’s look at the stuff that you’ll need.
What You Will Need
- Pastel blue nail polish
- Blue glitter nail polish
- Blue acrylic flowers
- Nail jewels
How To Apply?
1.Paint all your nails except the ring fingernail with the pastel blue shade.
2.Paint the ring fingernail with the blue glitter nail polish.
3.Apply the acrylic flowers on the accent nail and one other nail of your choice.
4.Apply the jewels to your nails. Try and use different colors of blue for an added effect.
6. Heart Acrylic Nails with Red Tips
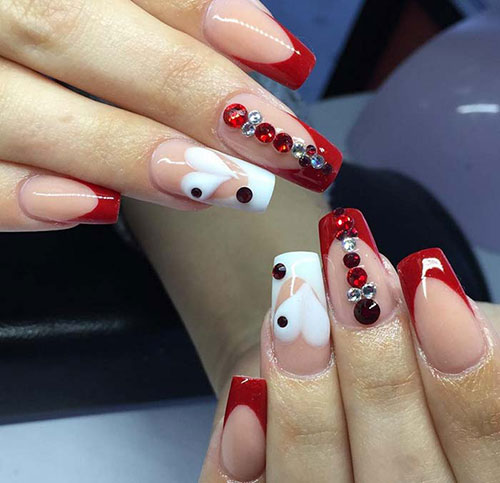
If Valentine’s Day is coming up and you’re looking for a cute nail art manicure that will stand out, then try this one! It has all the colors of the ‘Day of Love’. The addition of the jewels makes it look super fancy!
What You Will Need
- Red nail polish
- White nail polish
- Red and white nail jewels
- Dotting tool
- Fine brush
- Top coat
How To Apply?
1.Apply the red nail polish to the tips in a ‘v’ shape. Leave the ring fingernail bare.
2.Do the same on the ring fingernail with the white nail polish.
3.Create two dots next to each other with the dotting tool dipped in white nail polish and 4.use the fine brush to create the bottom of the heart.
5.Apply the jewels tastefully as shown on the middle fingernails and the accent nail.
6.Seal the manicure with a top coat.
7. Valentines Acrylic Nails with Love Letters
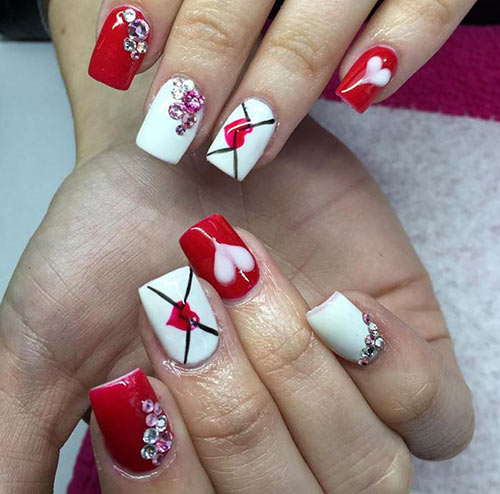
Another artistic manicure for the big V-Day, involving love letters! Before the age of texting, it was all about hand written love notes. Sometimes even today, a lot of people like sending love letters for the sentiment!
What You Will Need
- Red nail polish
- White nail polish
- Nail jewels
- Black nail polish
- Fine brush
- Dotting tool
- Top coat
How To Apply?
1.Apply the red polish on the index, thumb and pinky fingernails, while painting the middle and ring fingernails white.
2.Use the fine brush to create a letter on the middle fingernail. Add a heart to the opening.
3.Create a heart with the help of a dotting tool and the fine brush on the pinky.
4.Place the nail jewels on the rest of the nails.
5.Finish the manicure with a top coat.
